
Interfacing IoT with embedded using Node.js, part 3: Accelerometer
September 22, 2017

Let?s look at the package for reading the accelerometer, service-mma8451. We'll be implementing support for service-mma8451 entirely in javascript.
In "Interfacing IoT with embedded using Node.js part 2" we looked at GPIO control in our IoT interfacing demo package, the ts7680-demo-server. Now let’s look at the package for reading the accelerometer, service-mma8451. We'll be implementing support for service-mma8451 entirely in javascript.
The TS-7680 board used in this project carries an MMA8451 triple-axis accelerometer chip, which is supported in Linux is via a polling driver. Unfortunately, this polling architecture severely limits the sample rate. In practice it yields 20-30 samples per second, even at the highest polling rate, compared to the raw rate of 800 Hz that the chip is capable of. A higher sample rate is possible with a custom driver like those engineered by Technologic Systems. For our purposes though, the low sample rate will be sufficient.
The default kernel shipping on the TS-7680 currently does not have MMA8451 chip support compiled in. While it will be present in future releases, this means the kernel must first be compiled and installed on the board per instructions in the TS-7680 manual.
ts7680-demo-server.js:
.API("mma8451")
If you have a kernel without accelerometer support this is especially important to do, as the lack of certain files will cause the server to terminate.
Setting up the accelerometer
The accelerometer can be accessed via the /dev/input/event0 special file. Each read of this file will return an integral number of events, so setting up some kind of state machine to handle partial data returns isn't necessary. However, each accelerometer sample is typically comprised of at least 4 events: one for each axis of the accelerometer, and one indicating that the data is complete.
In the mma8451.js implementation there are just three functions. The first to look at is assigned to the module.exports variable, which is called when the package is first initialized. The function will starts by checking for options. If there is a string option, that will be used as the endpoint instead of the default endpoint, "/accelerometer/":

Next, we send a message to the log indicating that the service was entered. While the logging framework will already log the IP address of the caller and the URL, this is an additional piece of information to indicate the request was routed correct.

Afterwards the accelerometer needs to be initialized. The accelerometer can be enabled by writing a value of 1 to the appropriate file in the sys filesystem:

The polling period should be set to 10 ms. This is the smallest value we can use for this kernel.

The scaling factor should be set to +/-2 gs, or up to two gs (19.62 m/s^2), by writing a value of 0. It is possible to set it to a higher value such as +/-4 gs (by writing a 1) or +/-8 gs (by writing a 2) if a higher acceleration range is needed at the expense of lower resolution.

Finally, call the express app to respond to GET requests from the endpoint by calling the Server function. Append a parameter to the base supplied endpoint – express will convert the name provided into a key in the “param” object in the request object passed to our service function:

The Server function will now be called to handle the HTTP requests for accelerometer data at any URL that starts with “/accelerometer/”, or whatever endpoint is passed in the options. Any additional characters in the URL after this string will be accepted, allowing parameters to be passed. The function prototype of the handler looks like other express handlers, taking a request object (req) and response object (res).

Handling HTTP requests for accelerometer data
The first thing to do in the Server function is interpret the parameter as a number – this is the number of milliseconds the accelerometer will be sampled. Sanity check this value, allowing any positive amount of time up to one hour. In practice, such a long sample time is probably not useful, but we have to draw the line somewhere:

At this point we are committed to sending accelerometer values to the client, so go ahead and write out an HTTP header.

We will be sending plain text, one sample per line with the comma separate values of time (as number of milliseconds since the Epoch), and x, y, and z-axis values as raw accelerometer-reported integers. To begin sampling the listen function needs to be called, which takes a callback function to which it will pass the time, x, y, and z values whenever a sample is received. Write these values directly out to the response data:

This stored the return value from listen in the acc variable. The return value is an object containing a function named stop, which when called will terminate the sampling process. Call setTimeout to receive a callback in the number of milliseconds specified by the client, and when it is received call the stop function and then end the response to the client:

Now on to the listen function, where the actual work of streaming data off of /dev/input/event0 and turning it into samples takes place.
Streaming and sampling accelerometer data
First, declare some local variables:

The fd variable will hold the file descriptor for the event file. The x, y, z, and t variables will hold the components of each sample until they are ready to be sent to the caller. The state variable holds the current state of the input stream (each sample is sent as multiple events, and this variable will keep track of whenever the whole sample is received). Finally, the ret variable will hold the return value, which will be an object containing a function to stop the sampling process.
Start by opening the event device file. Once this is done the accelerometer will begin taking samples.

Whenever a sample is taken, multiple events will be received. Node.js will take care of automatically reading data whenever it is available, so set up a callback to accept this data and process it:

The chunk parameter will be a buffer containing the data read from the file. The first thing to do is read events from the chunk. Each event is 16 bytes long. In C, the structure of an event looks like this:
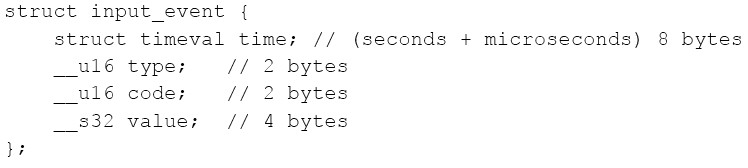
Data from the event device will always be available in multiples of 16 bytes, so no special logic to handle partial events is required. Here is the code to process chunks of event data:

The while loop keeps us reading as long as there is at least one chunk of data left. The index variable, i, is used to keep track of the offset in the chunk that is being processed next. The Buffer functions readUInt32LE and readUInt16LE are used to read 16- and 32-bit integers from the specified offset in the buffer in little endian format.
Once the event has been read, advance the index. Then check if the event is of type 3, indicating that a sample element is present; if it is, look at the code to determine whether it is the x, y, or z-axis part of the sample.
Note that the time is included redundantly in each event, and should be the same for all parts of the same sample, so the value directly from the event can be used. When an event of type 0, code 0 is received, this indicates that the sample is complete. However, you can use the state variable to keep track of which parts of the sample have been recorded and only send the sample if all of them have been received. Parts of a sample are normally only missed if you start reading events in the middle of a sample (which actually does occur).
Finally, having set up the function to process samples streamed from the kernel, set up the return value object with the stop function, which closes the file descriptor to stop the streaming.

In our next installment, we'll look at implementing support for the analog to digital convertors (ADCs).


