Interfacing IoT with embedded using Node.js, part 4: ADC
October 02, 2017

The service-md28adc package demonstrates how to run C code called from Node.js. This code implements the reading of the i.MX28 ADC registers in the CPU via memory mapping of these registers.
In "Interfacing IoT with embedded using Node.js part 3" we looked at the package for reading the accelerometer, service-mma8451. In part 4, we focus on reading ADC registers.
The service-md28adc package demonstrates how to run C code called from Node.js. This code implements the reading of the i.MX28 ADC registers in the CPU via memory mapping of these registers. This code is adapted directly from the sample code provided by Technologic Systems for the TS-7680. The main addition here is the code to interface Node.js to C.
Node.js uses a C++ interface, therefore the code must be written in C++. Our implementation is in mx28adc.cc. In this file there is an init function, adapted from mx28adcctl.c, which opens /dev/mem and memory maps three regions of the CPU ADC interface to volatile unsigned int pointers. These can be used to access the CPU registers needed to perform ADC functions.
Second is the adcread function, also adapted from mx28adcctl.c, which sets up the ADCs and obtains seven samples. These samples are averaged and placed in the buffer.
An include file for “Native Abstractions for Node.js,” or NAN, must be placed at the top of the file. The interface for creating add-ons has changed as Node.js has matured, and NAN abstracts away these differences to allow the creation of code that works on Node.js versions 0.8, 0.10, 0.12, and 1-7.

The code used to create a Node.js add-on is in the ADC function, which conforms to the parameter requirements of Node.js add-ons. Specifically, it has a prototype that looks like this:

We are taking a single parameter called info. This is of a complicated NAN class we don't need to worry about at this point.
In this function, first declare a buffer to hold the samples from all eight ADCs read by adcread:

Next, call init if has not be called yet. A global variable is used to determine this:

Now call adcread to fill the buffer with samples:

Next, construct a JavaScript array of length 8, and set the value of each element in this array to the corresponding ADC sample value:

Then, set up the array to be the return value as seen by the call into the function from JavaScript. This is slightly more complicated than a simple return statement, as it bridges from C++ back to JavaScript!

In addition to the ADC function, an Init function (note the uppercase “I”, which makes this different from our init function) must be defined. The two important parts here are “get” and ADC. These define the name of the module element on the JavaScript side that is called to access the function, as well as the name of the function on the C++ side that gets called:
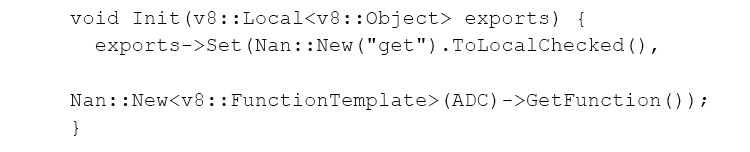
Now, invoke a macro to associate the Init function with the module name:

The mx28adc.js file provides a thin wrapper, which responds to requests for the ADC values by calling the addin function defined in mx28adc.cc to sample the ADCs and then outputs these values on the connection socket.
The beginning of this line sets up the binding node and our C++ add-on:

Specifically, the bindings module returns a function that is called with the relative path of the binary. This will be created during the build process from the C++ source code, and have a suffix of “.node”. The return from the call is a JavaScript object that refers to the add-on. Since the add-on defines one function, get, this function is accessible as an element of the returned object. Calling this function essentially calls into the C++ code.
Next is the Server function. It is a standard express handler function and will be called whenever the endpoint is requested by a client. It logs entry, sets the content type of the response to text/plain, and then calls into the C++ code using mx28adc.get() to retrieve the ADC values. It then takes the array and converts it into a string, with one number per line:

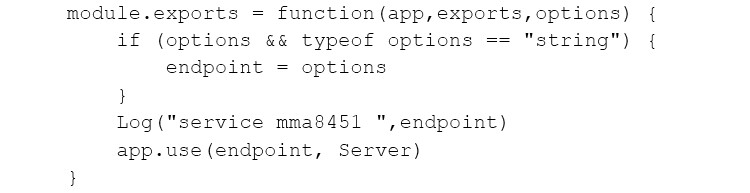
Finally, module.export is set to the initialization function, which checks for an option to change the endpoint string and associates the endpoint with the Server function:
The binding.gyp file has information required to compile the C++ code. The build process is automatically invoked when the package is installed.
In our next and final installment, we will construct a user interface that utilizes the services we have implemented in order to control the board from a web browser.
Technologic Systems
LinkedIn: www.linkedin.com/company/technologic-systems
Facebook: www.facebook.com/embeddedARM
Google+: https://plus.google.com/+Embeddedarm-TS
YouTube: www.youtube.com/user/embeddedarm
GitHub: https://github.com/embeddedarm